Tuesday, May 22, 2012

EEZY PEEZY MODULAR BLOCK - TUTORIAL

Let me begin by saying..........this is my very first tutorial so I am open to any advice or criticism.

Begin with  5 or 6 different fabrics, plus an accent color or colors for this retro looking 9 1/2" block. I used 5 fabrics for this set of blocks, although in this photo you can see only 4. Iron and stack neatly. With rotary cutter, square off 2 sides, then cut remaining two sides so that you have 5  8" X 9" stacked blocks.

Measure 1 1/2" inches in on the 8" side and cut with rotary cutter. Separate stack,(fig 2) remove top strip and transfer to the bottom of the pile. (fig 3)
(fig 1) Stack of 5 squared  fabrics  (8"X9")

  
(fig 2) First cut 1 1/2" inches wide.  Can be cut up to 2" inches


 (fig 3) Remove top fabric and relocate to bottom of stack


Cut 5 strips of contrasting color. 2 1/2 inches wide by 9 inches long. Sew strip to cut sides of block. Block will now be 10" wide. (not 8) Press and restack all blocks, place on mat and prepare to make a second cut.
Completed first cut and strip
Second Cut begins with figure 4
(fig 4) Now make second cut 2 1/4"  down from the top

(fig 5) Reverse stack

(Fig 6) Remove top 2 strips and place on the bottom of the stack
(Fig 7)  Completed cut and re stacked

Now cut a final contrasting strip 1 1/2" wide by 9 1/2" long, sew strip onto  block for a completed 9 1/2" X 9 1/2" block. Square up if necessary.


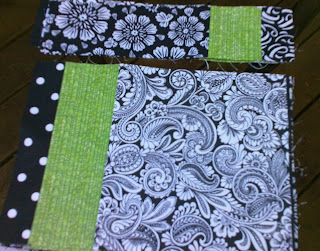
completed block


                Another view of a completed block


Full set of 4 blocks. Arrange at will, have fun with it!
 More to come............. 


Saturday, May 19, 2012

Sock Monkey's and more - The Griddle Cake Caper

Quilt # 1 - Griddle cakes 

Thought I found the perfect design for this quilt. However, I am still learning with each quilt I make. I soon discovered that the brown fabric with bananas was like using red.  It overpowered the other colors on the quilt. In the case of this fabric...........less is more!   
I continued to assemble the quilt. However, once completed I found it to be OK, but not a love affair for me.  So, I began the task of seeking another design for the this adorable sock monkey fabric.

See below for a very different view of this fabric.  It is amazing that the quilt below is the same fabrics, with a few additions

Sock Monkeys - Same Fabric Different Quilt

So this is the second quilt.  I chose to not use the brown with bananas on the second quilt and tried to think outside the box in terms of color, so I brought it some fabrics that were compatible, but not part of the sock monkey companion fabrics


Quilt was a big hit.  Photo is Kristen (mother to be) holding the quilt.  Below is the awesome cake her Mother Barbara made for the shower.  Barbara is a very talented cake decorator. Our very own "Cake Boss"!

Sunday, April 29, 2012


Bento Block Quilt 

Soooo............. Now that I have completed Jane's quilt, I am inspired to complete a quilt of my own.  About 3 years ago, my daughter Denise thought it would be fun for the three of us (Denise, Dawn, and I)  to make a quilt a year.  One for each of us.  The idea was the person whose quilt we were creating, select the pattern, and color.  Each would shop for fabrics and work on our assigned blocks, then when we came together (Denise lives in Florida, Dawn and I live in NJ) we would assemble the blocks.  The final assembly would be left to the person whose quilt it was going to be.  The consensus was  that MOM would be the first to have a quilt made.  So,  I selected the pattern, Modified Bento Block.  Gave my daughters a piece of the fabric from my bedroom drapes, and off we went!   One of things not discussed was the 1/4 " seam.  We each created a block with a quarter inch seam, but  believe it or not, they were not all the same 1/4".  I was very discouraged  as the squares did not line up as per the design, so I put the blocks aside for almost 2 years.  I am a perfectionist, a Type A, in fact I always referred to myself as a double A!   Since retiring I can honestly say I am down to an A minus. Completing Jane's quilt and realizing that perfection does not always mean  "PERFECT".  That the overall look is far more important, in other words, the big picture!  So one night I laid all of the blocks out on the floor. (with Abby my dog, jumping around on them) and  I located the smallest block among the group and decided on a final size for all of the blocks.  I then measured and rotary cut them all.  Then began assembly.  I am pretty happy with the completed top, and will be moving on the assembling the back and quilting it.   

Abby-Licious!


Wednesday, March 7, 2012

"LABOR OF LOVE"

Several months ago my sister in-law had the opportunity to view some of the work I had been doing. She asked if I would consider completing a quilt she began around 1978 when her son was about 14 years old.   What was completed by her was a sampler top, sans borders, made up of 12 different blocks.  This was part of a learn to quilt class.  I took the same class, but maybe not at the same time as Jane.


I took on the task and I must say, it has become a labor of love to me.  The challenge became finding fabrics that would coordinate with the fabics in the original top.  The shades and hues of the original top were not readily available.  I could only assume that they aren't currently popular. I was able to find some prints and solids that were close but no cigar!
"NOW THE HARD PART!!"


 I began the task of dissassembling some of the squares to incorporate the new hues of blue I was adding.  Unfortunately I did not record my progress in photo, (and should have!) I was uncertain how things would turn out, and how long this process was going to take......... and........of concern........would I become too frustrated to finish.  

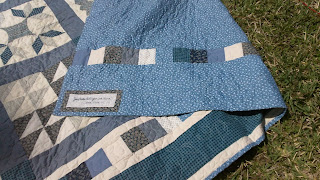
After incorporating the new colors to the blocks, and the border surrounding the sampler blocks, I had to decide on the final borders to bring the top up to a queen size. Not wanting the monotony of strip borders, I then decided on the running blocks.  I encased the block borders in muslin on either side.  I must say they look great. As if that were the original plan.  I also added a strip of the blocks onto the quilt backing, so that if the quilt is turned down, it will still show beautifully.
I am very pleased with the completed work, as this is my first queen sized completed project.  The quilt is wonderful! And I am proud!

The top and backing were ready to assemble before leaving for Florida for the winter, so I took it with me to have professionally quilted by machine while in Florida.  This would have taken weeks to quilt. The quilter did beautiful work and now my "Labor of Love" is complete and ready for delivery. 

As a final note...I embroidered Jane's name and year on the quilt backing so that it can become a family heirloom to pass on to her children or grandchildren.

Now onto the next project!